用Node.js, React和Socket.io创建一个看板应用
jinling -本文为译文,原文地址为:
Building a Kanban board with Node.js, React and Websockets 关于在这篇文章中,你可以学习如何构建一个看板应用,类似在JIRA, MonDay或者Trello等应用中看到那样。这个应用,将包含一个漂亮的drag-and-drop功能,使用的技术是React, Socket.io和DND(拖拽)技术。用户可以登录、创建并更新不同的任务,也可以添加评论。
Socket.io是一个流行的Javascript库,可以在浏览器和Node.js服务端之间创建实时的、双向的通信。它有着很高的性能,哪怕是处理大量的数据,也能做到可靠、低延时。它遵守WebSocket协议,但提供更好的功能,比如容错为HTTP长连接以及自动重连,这样能构建更为有效的实时应用。
开始创建创建项目根目录,包含两个子文件夹client和server
mkdir todo-list
cd todo-list
mkdir client server进入client目录,并创建一个React项目。
cd client
npx create-react-app ./
安装Socket.is Client API和React Router.React Router帮我们处理应用中的路由跳转问题。
npm install socket.io-client react-router-dom删除无用的代码,比如Logo之类的,并修改App.js为以下代码。
function App() {
    return (
        <div>
            <p>Hello World!</p>
        </div>
    );
}
export default App;切换到server目录,并创建一个package.json文件。
cd server && npm init -y安装Express.js, CORS, Nodemon和Socket.io服务端API.
Express.js是一个快速、极简的Node.js框架。CORS可以用来处于跨域问题。Nodemon是一个Node.js开发者工具,当项目文件改变时,它能自动重启Node Sever。
npm install express cors nodemon socket.io创建入口文件index.js
touch index.js下面,用Express.js创建一个简单的Node服务。当你在浏览器中访问http://localhost:4000/api时,下面的代码片断将返回一个JSON对象。
//👇🏻index.js
const express = require("express");
const app = express();
const PORT = 4000;

app.use(express.urlencoded({ extended: true }));
app.use(express.json());

app.get("/api", (req, res) => {
    res.json({
        message: "Hello world",
    });
});

app.listen(PORT, () => {
    console.log(`Server listening on ${PORT}`);
});
启动以上服务
node index.js修改一下index.js,引入http和cors包,以允许数据在不同域名之间传输。
const express = require("express");
const app = express();
const PORT = 4000;

app.use(express.urlencoded({ extended: true }));
app.use(express.json());

//New imports
const http = require("http").Server(app);
const cors = require("cors");

app.use(cors());

app.get("/api", (req, res) => {
    res.json({
        message: "Hello world",
    });
});

http.listen(PORT, () => {
    console.log(`Server listening on ${PORT}`);
});接下来,我们在app.get()代码块上方,添加以下代码,用socket.io创建实时连接。
// New imports
// .....
const socketIO = require('socket.io')(http, {
    cors: {
        origin: "http://localhost:3000"
    }
});

//Add this before the app.get() block
socketIO.on('connection', (socket) => {
    console.log(`⚡: ${socket.id} user just connected!`);
    socket.on('disconnect', () => {
            socket.disconnect()
      console.log('🔥: A user disconnected');
    });
});以下代码中,当有用户访问页面时,socket.io("connection")方法创建了一个与客户端(client React项目)的连接,生成一个唯一ID,并通过console输出到命令行窗口。
当你刷新或者关闭页面时,会触发disconnect事件。
以上代码,每次编辑后,都需要手动重启node index.js,很不方便。我们配置一下Nodemon,以实现自动更新。在package.json文件中添加以下代码。
//In server/package.json

"scripts": {
    "test": "echo \"Error: no test specified\" && exit 1",
    "start": "nodemon index.js"
},
这样,我们就可以用以下命令来启动服务。
npm start客户端用户界面,包含Login Page/Task Page和Comment Page三个页面。
cd client/src
mkdir components
cd components
touch Login.js Task.js Comments.js更新App.js为以下代码。
import { BrowserRouter, Route, Routes } from "react-router-dom";
import Comments from "./components/Comments";
import Task from "./components/Task";
import Login from "./components/Login";

function App() {
    return (
        <BrowserRouter>
            <Routes>
                <Route path='/' element={<Login />} />
                <Route path='/task' element={<Task />} />
                <Route path='/comments/:category/:id' element={<Comments />} />
            </Routes>
        </BrowserRouter>
    );
}

export default App;修改src/index.css为以下样式.
@import url("https://fonts.googleapis.com/css2?family=Space+Grotesk:[email protected];400;500;600;700&display=swap");
* {
    font-family: "Space Grotesk", sans-serif;
    box-sizing: border-box;
}
a {
    text-decoration: none;
}
body {
    margin: 0;
    padding: 0;
}
.navbar {
    width: 100%;
    background-color: #f1f7ee;
    height: 10vh;
    border-bottom: 1px solid #ddd;
    display: flex;
    align-items: center;
    justify-content: space-between;
    padding: 20px;
}
.form__input {
    min-height: 20vh;
    display: flex;
    align-items: center;
    justify-content: center;
}
.input {
    margin: 0 5px;
    width: 50%;
    padding: 10px 15px;
}
.addTodoBtn {
    width: 150px;
    padding: 10px;
    cursor: pointer;
    background-color: #367e18;
    color: #fff;
    border: none;
    outline: none;
    height: 43px;
}
.container {
    width: 100%;
    min-height: 100%;
    display: flex;
    align-items: center;
    justify-content: space-between;
    padding: 10px;
}

.completed__wrapper,
.ongoing__wrapper,
.pending__wrapper {
    width: 32%;
    min-height: 60vh;
    display: flex;
    flex-direction: column;
    padding: 5px;
}
.ongoing__wrapper > h3,
.pending__wrapper > h3,
.completed__wrapper > h3 {
    text-align: center;
    text-transform: capitalize;
}
.pending__items {
    background-color: #eee3cb;
}
.ongoing__items {
    background-color: #d2daff;
}
.completed__items {
    background-color: #7fb77e;
}
.pending__container,
.ongoing__container,
.completed__container {
    width: 100%;
    min-height: 55vh;
    display: flex;
    flex-direction: column;
    padding: 5px;
    border: 1px solid #ddd;
    border-radius: 5px;
}
.pending__items,
.ongoing__items,
.completed__items {
    width: 100%;
    border-radius: 5px;
    margin-bottom: 10px;
    padding: 15px;
}
.comment {
    text-align: right;
    font-size: 14px;
    cursor: pointer;
    color: rgb(85, 85, 199);
}
.comment:hover {
    text-decoration: underline;
}
.comments__container {
    padding: 20px;
}
.comment__form {
    width: 100%;
    display: flex;
    align-items: center;
    justify-content: center;
    flex-direction: column;
    margin-bottom: 30px;
}
.comment__form > label {
    margin-bottom: 15px;
}
.comment__form textarea {
    width: 80%;
    padding: 15px;
    margin-bottom: 15px;
}
.commentBtn {
    padding: 10px;
    width: 200px;
    background-color: #367e18;
    outline: none;
    border: none;
    color: #fff;
    height: 45px;
    cursor: pointer;
}
.comments__section {
    width: 100%;
    display: flex;
    align-items: center;
    justify-content: center;
    flex-direction: column;
}

.login__form {
    width: 100%;
    height: 100vh;
    display: flex;
    flex-direction: column;
    align-items: center;
    justify-content: center;
}
.login__form > label {
    margin-bottom: 15px;
}
.login__form > input {
    width: 70%;
    padding: 10px 15px;
    margin-bottom: 15px;
}
.login__form > button {
    background-color: #367e18;
    color: #fff;
    padding: 15px;
    cursor: pointer;
    border: none;
    font-size: 16px;
    outline: none;
    width: 200px;
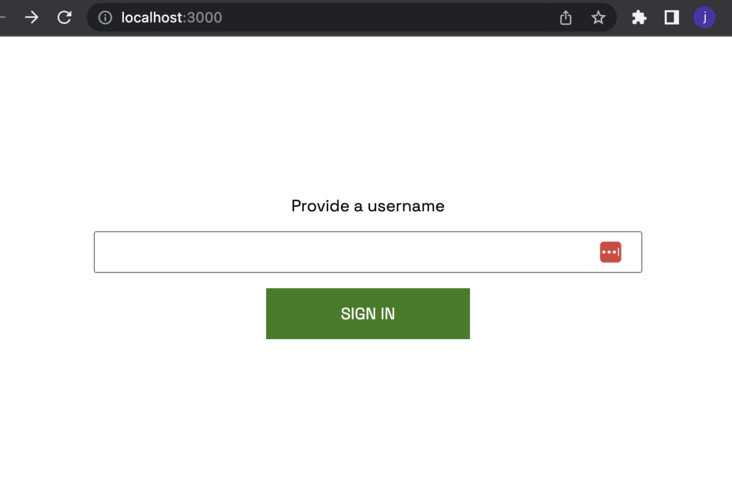
}登录页接收username参数,将其存在local storage中用于用户认证。
更新Login.js如下:
import React, { useState } from "react";
import { useNavigate } from "react-router-dom";

const Login = () => {
    const [username, setUsername] = useState("");
    const navigate = useNavigate();

    const handleLogin = (e) => {
        e.preventDefault();
        //👇🏻 saves the username to localstorage
        localStorage.setItem("userId", username);
        setUsername("");
        //👇🏻 redirects to the Tasks page.
        navigate("/tasks");
    };
    return (
        <div className='login__container'>
            <form className='login__form' onSubmit={handleLogin}>
                <label htmlFor='username'>Provide a username</label>
                <input
                    type='text'
                    name='username'
                    id='username'
                    required
                    onChange={(e) => setUsername(e.target.value)}
                    value={username}
                />
                <button>SIGN IN</button>
            </form>
        </div>
    );
};

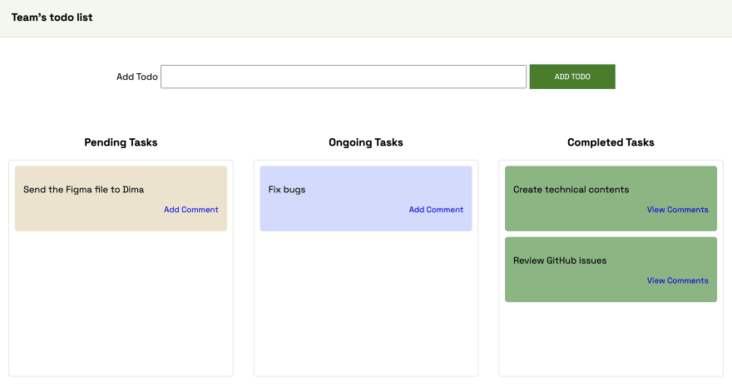
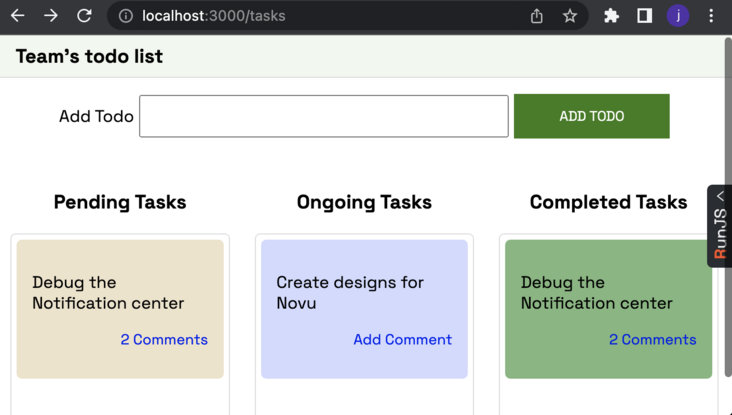
export default Login;任务页是该应用的主体页面,最终效果如下图。其分为三个部分:Nav.js,AddTask.js-处理用户输入,和TaskContainer.js-任务列表。
cd src/components
touch Nav.js AddTask.js TasksContainer.js在Task.js引用上面的三个组件。
// Task.js
import React from "react";
import AddTask from "./AddTask";
import TasksContainer from "./TasksContainer";
import Nav from "./Nav";
import socketIO from "socket.io-client";

const socket = socketIO.connect("http://localhost:4000");

const Task = () => {
    return (
        <div>
            <Nav />
            <AddTask socket={socket} />
            <TasksContainer socket={socket} />
        </div>
    );
};

export default Task;下面是Nav.js
import React from "react";

const Nav = () => {
    return (
        <nav className='navbar'>
            <h3>Team's todo list</h3>
        </nav>
    );
};
export default Nav;AddTask.js如下:
import React, { useState } from "react";

const AddTask = ({ socket }) => {
    const [task, setTask] = useState("");

    const handleAddTodo = (e) => {
        e.preventDefault();
        //👇🏻 Logs the task to the console
        console.log({ task });
        setTask("");
    };
    return (
        <form className='form__input' onSubmit={handleAddTodo}>
            <label htmlFor='task'>Add Todo</label>
            <input
                type='text'
                name='task'
                id='task'
                value={task}
                className='input'
                required
                onChange={(e) => setTask(e.target.value)}
            />
            <button className='addTodoBtn'>ADD TODO</button>
        </form>
    );
};

export default AddTask;TaskContainer.js如下:
import React from "react";
import { Link } from "react-router-dom";

const TasksContainer = ({ socket }) => {
    return (
        <div className='container'>
            <div className='pending__wrapper'>
                <h3>Pending Tasks</h3>
                <div className='pending__container'>
                    <div className='pending__items'>
                        <p>Debug the Notification center</p>
                        <p className='comment'>
                            <Link to='/comments'>2 Comments</Link>
                        </p>
                    </div>
                </div>
            </div>

            <div className='ongoing__wrapper'>
                <h3>Ongoing Tasks</h3>
                <div className='ongoing__container'>
                    <div className='ongoing__items'>
                        <p>Create designs for Novu</p>
                        <p className='comment'>
                            <Link to='/comments'>Add Comment</Link>
                        </p>
                    </div>
                </div>
            </div>

            <div className='completed__wrapper'>
                <h3>Completed Tasks</h3>
                <div className='completed__container'>
                    <div className='completed__items'>
                        <p>Debug the Notification center</p>
                        <p className='comment'>
                            <Link to='/comments'>2 Comments</Link>
                        </p>
                    </div>
                </div>
            </div>
        </div>
    );
};

export default TasksContainer;
恭喜你!页面布局已完成。下面,我们为评论页面创建一个简单的模板。
Comments Page(评论页)Comments.js代码如下:
import React, { useEffect, useState } from "react";
import socketIO from "socket.io-client";
import { useParams } from "react-router-dom";

const socket = socketIO.connect("http://localhost:4000");

const Comments = () => {
    const [comment, setComment] = useState("");

    const addComment = (e) => {
        e.preventDefault();
        console.log({
            comment,
            userId: localStorage.getItem("userId"),
        });
        setComment("");
    };

    return (
        <div className='comments__container'>
            <form className='comment__form' onSubmit={addComment}>
                <label htmlFor='comment'>Add a comment</label>
                <textarea
                    placeholder='Type your comment...'
                    value={comment}
                    onChange={(e) => setComment(e.target.value)}
                    rows={5}
                    id='comment'
                    name='comment'
                    required
                ></textarea>
                <button className='commentBtn'>ADD COMMENT</button>
            </form>

            <div className='comments__section'>
                <h2>Existing Comments</h2>
                <div></div>
            </div>
        </div>
    );
};

export default Comments;
这样,所有页面的基本功能就实现了,运行以下命令看看效果。
cd client/
npm start

这一小节,你将学会在React应用中添加react-beautiful-dnd组件,使得任务可以从不同分类(pending, ongoing, completed)中移动。
打开server/index.js,创建一个变量来存储模拟的数据,如下:
//👇🏻 server/index.js

//👇🏻 Generates a random string
const fetchID = () => Math.random().toString(36).substring(2, 10);

//👇🏻 Nested object
let tasks = {
    pending: {
        title: "pending",
        items: [
            {
                id: fetchID(),
                title: "Send the Figma file to Dima",
                comments: [],
            },
        ],
    },
    ongoing: {
        title: "ongoing",
        items: [
            {
                id: fetchID(),
                title: "Review GitHub issues",
                comments: [
                    {
                        name: "David",
                        text: "Ensure you review before merging",
                        id: fetchID(),
                    },
                ],
            },
        ],
    },
    completed: {
        title: "completed",
        items: [
            {
                id: fetchID(),
                title: "Create technical contents",
                comments: [
                    {
                        name: "Dima",
                        text: "Make sure you check the requirements",
                        id: fetchID(),
                    },
                ],
            },
        ],
    },
};

//👇🏻 host the tasks object via the /api route
app.get("/api", (req, res) => {
    res.json(tasks);
});在TasksContainer.js文件中,获取tasks数据,并转成数组渲染出来。如下:
import React, { useState, useEffect } from "react";
import { Link } from "react-router-dom";

const TasksContainer = () => {
    const [tasks, setTasks] = useState({});

    useEffect(() => {
        function fetchTasks() {
            fetch("http://localhost:4000/api")
                .then((res) => res.json())
                .then((data) => {
                    console.log(data);
                    setTasks(data);
                });
        }
        fetchTasks();
    }, []);

    return (
        <div className='container'>
            {
            {Object.entries(tasks).map((task) => (
                <div
                    className={`${task[1].title.toLowerCase()}__wrapper`}
                    key={task[1].title}
                >
                    <h3>{task[1].title} Tasks</h3>
                    <div className={`${task[1].title.toLowerCase()}__container`}>
                        {task[1].items.map((item, index) => (
                            <div
                                className={`${task[1].title.toLowerCase()}__items`}
                                key={item.id}
                            >
                                <p>{item.title}</p>
                                <p className='comment'>
                                    <Link to='/comments'>
                                        {item.comments.length > 0 ? `View Comments` : "Add Comment"}
                                    </Link>
                                </p>
                            </div>
                        ))}
                    </div>
                </div>
            ))}
        </div>
    );
};

export default TasksContainer;安装react-beautiful-dnd,并在在TasksContainer.js中引用依赖。
npm install react-beautiful-dnd更新TasksContainer.js的import部分:
import { DragDropContext, Droppable, Draggable } from "react-beautiful-dnd";更新TasksContainer.js的render部分:
return (
    <div className='container'>
        {/** --- 👇🏻 DragDropContext  ---- */}
        <DragDropContext onDragEnd={handleDragEnd}>
            {Object.entries(tasks).map((task) => (
                <div
                    className={`${task[1].title.toLowerCase()}__wrapper`}
                    key={task[1].title}
                >
                    <h3>{task[1].title} Tasks</h3>
                    <div className={`${task[1].title.toLowerCase()}__container`}>
                        {/** --- 👇🏻 Droppable --- */}
                        <Droppable droppableId={task[1].title}>
                            {(provided) => (
                                <div ref={provided.innerRef} {...provided.droppableProps}>
                                    {task[1].items.map((item, index) => (
                                            {/** --- 👇🏻 Draggable --- */}
                                        <Draggable
                                            key={item.id}
                                            draggableId={item.id}
                                            index={index}
                                        >
                                            {(provided) => (
                                                <div
                                                    ref={provided.innerRef}
                                                    {...provided.draggableProps}
                                                    {...provided.dragHandleProps}
                                                    className={`${task[1].title.toLowerCase()}__items`}
                                                >
                                                    <p>{item.title}</p>
                                                    <p className='comment'>
                                                        <Link to={`/comments/${task[1].title}/${item.id}`}>
                                                            {item.comments.length > 0
                                                                ? `View Comments`
                                                                : "Add Comment"}
                                                        </Link>
                                                    </p>
                                                </div>
                                            )}
                                        </Draggable>
                                    ))}
                                    {provided.placeholder}
                                </div>
                            )}
                        </Droppable>
                    </div>
                </div>
            ))}
        </DragDropContext>
    </div>
);DragDropContext包裹整个拖放(drag-and-drop)容器,Droppable是draggable elements的父元素。Droppable组件需要传入draggableId,Draggable组件需要传入draggableId。它们包含的子组件,可以通过provided获取拖拽过程中的数据,如provided.draggableProps、provided.drageHandleProp等。DragDropContext还接收onDragEnd参数,用于拖动完成时的事件触发。
//👇🏻 This function is the value of the onDragEnd prop
const handleDragEnd = ({ destination, source }) => {
    if (!destination) return;
    if (
        destination.index === source.index &&
        destination.droppableId === source.droppableId
    )
        return;

    socket.emit("taskDragged", {
        source,
        destination,
    });
};以上handleDragEnd函数,接收destination和source这两个参ovtt,并检查正在拖动的元素(source)是不是被拖动到一个可以droppable的目标(destination)元素上。如果source和destination不一样,就通过socket.io给Node.js server发个消息,表示任务被移动了。
handleDragEnd收到的参数,格式如下。
{
  source: { index: 0, droppableId: 'pending' },
  destination: { droppableId: 'ongoing', index: 1 }
}在后端server/index.js中创建taskDragged事件,来处理上面发送过来的消息。处理完后往客户端回复一个tasks事件。放在与connection事件处理函数的内部(与disconnect事件函数的位置同级),以确保socket是可用的。
socket.on("taskDragged", (data) => {
    const { source, destination } = data;

    //👇🏻 Gets the item that was dragged
    const itemMoved = {
        ...tasks[source.droppableId].items[source.index],
    };
    console.log("DraggedItem>>> ", itemMoved);

    //👇🏻 Removes the item from the its source
    tasks[source.droppableId].items.splice(source.index, 1);

    //👇🏻 Add the item to its destination using its destination index
    tasks[destination.droppableId].items.splice(destination.index, 0, itemMoved);

    //👇🏻 Sends the updated tasks object to the React app
    socket.emit("tasks", tasks);

    /* 👇🏻 Print the items at the Source and Destination
        console.log("Source >>>", tasks[source.droppableId].items);
        console.log("Destination >>>", tasks[destination.droppableId].items);
        */
});然后再在TasksContainer创建一个接收服务端tasks事件以监听获取最新的经过服务端处理(比如持久化到数据库)的tasks数据.
useEffect(() => {
    socket.on("tasks", (data) => setTasks(data));
}, [socket]);
这样,拖放的效果,就生效了。如下图:
小结一下
client端:TasksContainer,用户拖放操作,将数据以taskDragged事件的方式通过socket传给服务端server端:接收taskDragged事件,将tasks数据处理后,以tasks事件的方式推送到客户端client端:客户端接收到tasks事件后,将本地tasks数据替换为最新的部分,页面就显示拖放后的效果了如何创建新任务这一小节,将引导你如何在React应用中创建新的任务。
更新AddTask.js为以下代码,通过createTask事件向server端发送新任务的数据。
import React, { useState } from "react";

const AddTask = ({ socket }) => {
    const [task, setTask] = useState("");

    const handleAddTodo = (e) => {
        e.preventDefault();
        //👇🏻 sends the task to the Socket.io server
        socket.emit("createTask", { task });
        setTask("");
    };
    return (
        <form className='form__input' onSubmit={handleAddTodo}>
            <label htmlFor='task'>Add Todo</label>
            <input
                type='text'
                name='task'
                id='task'
                value={task}
                className='input'
                required
                onChange={(e) => setTask(e.target.value)}
            />
            <button className='addTodoBtn'>ADD TODO</button>
        </form>
    );
};

export default AddTask;在server端监听createTask事件,并在tasks数据中新增一条。
socketIO.on("connection", (socket) => {
    console.log(`⚡: ${socket.id} user just connected!`);

    socket.on("createTask", (data) => {
        // 👇🏻 Constructs an object according to the data structure
        const newTask = { id: fetchID(), title: data.task, comments: [] };
        // 👇🏻 Adds the task to the pending category
        tasks["pending"].items.push(newTask);
        /*
        👇🏻 Fires the tasks event for update
         */
        socket.emit("tasks", tasks);
    });
    //...other listeners
});这个小节,你将学到如何在每个任务下评论,并获取所有评论的列表。
更新Comments.js,通过addComment事件将评论数据传给服务端。如下:
import React, { useEffect, useState } from "react";
import socketIO from "socket.io-client";
import { useParams } from "react-router-dom";

const socket = socketIO.connect("http://localhost:4000");

const Comments = () => {
    const { category, id } = useParams();
    const [comment, setComment] = useState("");

    const addComment = (e) => {
        e.preventDefault();
        /*
        👇🏻 sends the comment, the task category, item's id and the userID.
         */
        socket.emit("addComment", {
            comment,
            category,
            id,
            userId: localStorage.getItem("userId"),
        });
        setComment("");
    };

    return (
        <div className='comments__container'>
            <form className='comment__form' onSubmit={addComment}>
                <label htmlFor='comment'>Add a comment</label>
                <textarea
                    placeholder='Type your comment...'
                    value={comment}
                    onChange={(e) => setComment(e.target.value)}
                    rows={5}
                    id='comment'
                    name='comment'
                    required
                ></textarea>
                <button className='commentBtn'>ADD COMMENT</button>
            </form>
            <div className='comments__section'>
                <h2>Existing Comments</h2>
                <div></div>
            </div>
        </div>
    );
};

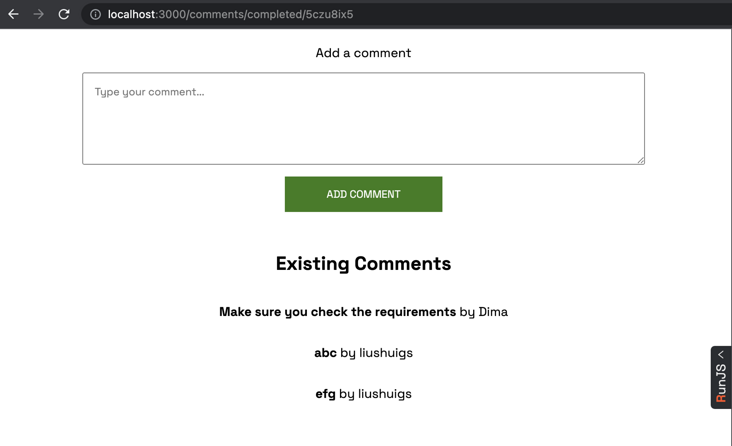
export default Comments;点击任务卡片中的View Comments进入Comment页面。填写评论的内容后点击Add Comment按钮,就可以将用户ID、任务分类、评分内容发送到服务端。
接下来,在服务端监听addComment事件,将评论存入对应任务的comments列表中。处理完成后,再通过comments事件,将最新评论推送到客户端。
socket.on("addComment", (data) => {
    const { category, userId, comment, id } = data;
    //👇🏻 Gets the items in the task's category
    const taskItems = tasks[category].items;
    //👇🏻 Loops through the list of items to find a matching ID
    for (let i = 0; i < taskItems.length; i++) {
        if (taskItems[i].id === id) {
    //👇🏻 Then adds the comment to the list of comments under the item (task)
            taskItems[i].comments.push({
                name: userId,
                text: comment,
                id: fetchID(),
            });
            //👇🏻 sends a new event to the React app
            socket.emit("comments", taskItems[i].comments);
        }
    }
});更新Comments.js,从服务端获取评论列表。如下(注意不是完整替换,只是新增了一些代码):
const Comments = () => {
    const { category, id } = useParams();
    const [comment, setComment] = useState("");
    const [commentList, setCommentList] = useState([]);

    //👇🏻 Listens to the comments event
    useEffect(() => {
        socket.on("comments", (data) => setCommentList(data));
    }, []);

    //...other listeners
    return (
        <div className='comments__container'>
            <form className='comment__form' onSubmit={addComment}>
                ...
            </form>

            {/** 👇🏻 Displays all the available comments*/}
            <div className='comments__section'>
                <h2>Existing Comments</h2>
                {commentList.map((comment) => (
                    <div key={comment.id}>
                        <p>
                            <span style={{ fontWeight: "bold" }}>{comment.text} </span>by{" "}
                            {comment.name}
                        </p>
                    </div>
                ))}
            </div>
        </div>
    );
};

export default Comments;添useEffect以处理初始页面加载评论的问题。
useEffect(() => {
    socket.emit("fetchComments", { category, id });
}, [category, id]);相应地,服务端也要提供fetchComments接口。如下:
socket.on("fetchComments", (data) => {
    const { category, id } = data;
    const taskItems = tasks[category].items;
    for (let i = 0; i < taskItems.length; i++) {
        if (taskItems[i].id === id) {
            socket.emit("comments", taskItems[i].comments);
        }
    }
});
评论功能,效果如下图:
恭喜你,这么长的一篇文章竟然看完了!
如果你不想一点点地复制,可以在这里获取完整的代码。
最后译文作者:liushuigs
创建于RunJS Chrome插件版。
Tags 标签
node.jsexpressreact.jssocket.io扩展阅读
深入理解函数调用原理
2021-01-07 14:58:59 []Deno 双周刊 #1 - Deno 获 2020 JS 年度突破开源奖
2021-01-08 08:54:29 []Spring Ioc 实例化 Bean 对象有几种方式?
2021-01-15 02:09:56 []Windows10错误在打开特定路径时导致BSOD崩溃
2021-01-19 06:56:04 []Lighthouse使用说明
2021-07-29 03:17:21 [米花儿团儿]电子物流中的EDI 应用
2021-07-28 23:52:25 [阿兵]Python实现一个简单的毕业生信息管理系统的示例代码!非常简单
2021-07-29 06:56:23 [mengy7762]MacBook Pro M1配置前端开发环境
2021-07-28 12:11:55 [summer]node js 各类数据库常用方法封装的、心路历程、、
2021-07-28 22:36:29 [wzj5cnaz]strapi安装
2021-07-29 09:16:13 [A_Ghost]加个好友,技术交流


