文章小程序全栈开发,从入门到上线,第3节——小程序登录
wzj5cnaz -1.新增用户表
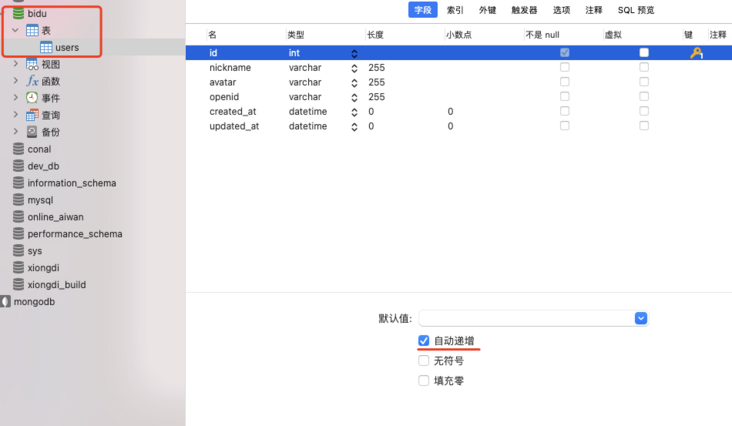
新增一个名为bidu的数据库,并添加一张用户表users,其中id为自动递增。请注意字段的数据类型,不要选错了。

(1).env
在server根目录,新建一个文件server/.env,并配置jwt的密钥和过期时间,数据库信息,以及微信小程序的相关信息。(注:.env文件不要同步git,里面放的都是一些敏感数据)
# .env

# jwt 密钥,任意字符串
JWT_TOKEN_SECRET=ZM_j3@faF93Mdaie2f
# jwt 生成的 token 的过期时间,单位秒
JWT_TOKEN_EXPIRATION_TIME=3600


# 微信小程序 appid
WECHAT_MINI_APP_ID=wx1f196182a0f906e7
# 微信小程序 secret
WECHAT_MINI_APP_SECRET=74d89************47c9f66aaeab

# mysql 数据库配置
MYSQL_HOST=localhost
MYSQL_USER=root
MYSQL_PASSWORD=12345678
MYSQL_DATABASE=bidu
MYSQL_PORT=3306
MYSQL_CHARSET=utf8mb4_unicode_ci
(2)constants.js
在后台根目录里,新建一个server/constants/constants.js文件,用来存放常量。添加微信小程序相关信息
/* constants.js */

const WEAPP = {
  APP_ID: process.env.WECHAT_MINI_APP_ID,
  APP_SECRET: process.env.WECHAT_MINI_APP_SECRET
}

module.exports = {
  WEAPP
}1.创建server/utils/WXBizDataCrypt.js,用于微信解密
/* WXBizDataCrypt.js */


var cryptoWx = require('crypto')

function WXBizDataCrypt(appId, sessionKey) {
  // @ts-ignore
  this.appId = appId
  // @ts-ignore
  this.sessionKey = sessionKey
}

WXBizDataCrypt.prototype.decryptData = function (encryptedData, iv) {
  // base64 decode
  var sessionKey = Buffer.from(this.sessionKey, 'base64')
  encryptedData = Buffer.from(encryptedData, 'base64')
  iv = Buffer.from(iv, 'base64')

  try {
     // 解密
    var decipher = cryptoWx.createDecipheriv('aes-128-cbc', sessionKey, iv)
    // 设置自动 padding 为 true,删除填充补位
    decipher.setAutoPadding(true)
    var decoded = decipher.update(encryptedData, 'binary', 'utf8')
    decoded += decipher.final('utf8')

    decoded = JSON.parse(decoded)

  } catch (err) {
    throw new Error('Illegal Buffer')
  }

  if (decoded.watermark.appid !== this.appId) {
    throw new Error('Illegal Buffer')
  }

  return decoded
}

module.exports = WXBizDataCrypt2.创建server/utils/jwt.js,用于jwt验证和token生成
/* jwt.js */

const mysql = require('access-db')

const jwt = require('jsonwebtoken')

const genToken = (uid) => {
  const jwt = require('jsonwebtoken')
  const token = jwt.sign({id: uid}, process.env.JWT_TOKEN_SECRET, {expiresIn: parseInt(process.env.JWT_TOKEN_EXPIRATION_TIME || '0')})
  return token
}


const authUse = async (req, res, next) => {
  if(!req.headers.authorization){
    res.send(401, '用户未登录')
  }
  const raw = req.headers.authorization.split(' ').pop()
  if(raw === 'Bearer'){
    res.send(401, '用户未登录')
  }
  const {id} = jwt.verify(raw, process.env.JWT_TOKEN_SECRET)
  req.user = (await mysql.get('users', id)).data
  next()
}


module.exports = {
  genToken,
  authUse
}
expiresIn为token的过期时间(秒)authUse: 判断用户是否登录的中间件,并将用户信息写入到req.user,方便使用。3.创建server/utils/utils.js,工具
/* utils.js */


// 获取当前时间  2021-4-7 16:25:21
const getTime = (type, stamp) => {
  let nowTime = stamp ? new Date(stamp) : new Date()

  let Y = nowTime.getFullYear()
  let M = nowTime.getMonth() + 1 < 10 ? '0' + (nowTime.getMonth() + 1) : (nowTime.getMonth() + 1)
  let D = nowTime.getDate() < 10 ? '0' + nowTime.getDate() : nowTime.getDate()
  let h = nowTime.getHours() < 10 ? '0' + nowTime.getHours() : nowTime.getHours()
  let m = nowTime.getMinutes() < 10 ? '0' + nowTime.getMinutes() : nowTime.getMinutes()
  let s = nowTime.getSeconds() < 10 ? '0' + nowTime.getSeconds() : nowTime.getSeconds()

  switch (type) {
    case 'date':
      return `${Y}-${M}-${D}`
    case 'date_time':
      return `${Y}-${M}-${D} ${h}:${m}:${s}`
    case 'stamp':
      return nowTime.getTime()
    default:
      return nowTime.getTime()
  }
}

module.exports = {
  getTime
}
4.创建server/routes/login.js,登录接口
/* login.js */


const express = require('express')
const {mysql} = require('access-db')
const axios = require('axios')

const {WEAPP} = require('../constants/constants')
const {getTime} = require('../utils/utils')
const {genToken} = require('../utils/jwt')

const WXBizDataCrypt = require('../utils/WXBizDataCrypt')

const loginRouter = express.Router()


// 仅获取sessionkey
loginRouter.post('/wechat_session_key', async function(req, res, next) {
  try{
    let {code} = req.body
    let sessionRes = await axios({
      url: 'https://api.weixin.qq.com/sns/jscode2session',
      params: {
        appid: WEAPP.APP_ID,
        secret: WEAPP.APP_SECRET,
        js_code: code,
        grant_type: 'authorization_code',
      }
    })
    res.json({
      session_key: sessionRes.data.session_key,
      openid: sessionRes.data.openid
    })
  }catch(err){
    res.status(500).send(err)
  }
})


// 小程序授权登录
loginRouter.post('/wechat', async function(req, res, next) {
  let {code, userInfo} = req.body
  if(!userInfo){
    userInfo = {
      nickName: null,
      avatarUrl: null,
    }
  }
  let sessionRes = await axios({
    url: 'https://api.weixin.qq.com/sns/jscode2session',
    params: {
      appid: WEAPP.APP_ID,
      secret: WEAPP.APP_SECRET,
      js_code: code,
      grant_type: 'authorization_code',
    }
  })
  // 如果小程序绑定了微信开放平台,则也会返回unionid
  let userRes = await mysql.find('users', {
    p0: ['openid', '=', sessionRes.data.openid],
    r: 'p0'
  })
  let nowTime = getTime('date_time')
  let resUser = {}
  if(userRes.data.objects.length === 0){
    //没有,新增用户
    let setRes = await mysql.set('users', {
      nickname: userInfo.nickName,
      avatar: userInfo.avatarUrl,
      openid: sessionRes.data.openid,
      created_at: nowTime,
      updated_at: nowTime,
    })
    if(setRes.data.insertId){
      let getRes = await mysql.get('users', setRes.data.insertId)
      resUser = {
        ...getRes.data,
        session_key: sessionRes.data.session_key,
        token: genToken(setRes.data.insertId)
      }
    }
  }else{
    //有用户,更新基本信息
    if(userInfo.avatarUrl){
      let updateRes = await mysql.update('users', userRes.data.objects[0].id, {
        nickname: userInfo.nickName,
        avatar: userInfo.avatarUrl,
        updated_at: nowTime,
      })
    }
    let getRes = await mysql.get('users', userRes.data.objects[0].id)
    resUser = {
      ...getRes.data,
      session_key: sessionRes.data.session_key,
      token: genToken(userRes.data.objects[0].id)
    }
  }
  res.json(resUser)
})


// 小程序获取手机号
loginRouter.post('/wechat_phone', async function(req, res, next) {
  let {openid, sessionKey, iv, encryptedData} = req.body
  var pc = new WXBizDataCrypt(WEAPP.APP_ID, sessionKey)
  var data = pc.decryptData(encryptedData , iv)

  let userList = (await mysql.find('users', {
    p0: ['openid', '=', openid],
    r: 'p0'
  })).data.objects
  let nowTime = getTime('date_time')
  let resUser = {}
  if(userList.length === 0){
    //没有,新增用户
    let id = (await mysql.set('users', {
      phone: data.phoneNumber,
      created_at: nowTime,
      updated_at: nowTime,
      openid: openid,
    })).data.insertId
    if(id){
      resUser = (await mysql.get('users', id)).data
    }
  }else{
    //有用户,更新基本信息
    if(userList[0].phone != data.phoneNumber){
      await mysql.update('users', userList[0].id, {
        phone: data.phoneNumber,
        updated_at: nowTime,
      })
    }
    resUser = (await mysql.get('users', userList[0].id)).data
  }
  res.json(resUser)
})

module.exports = loginRouter并在server/app.js里,引入,
/* app.js */
...
var indexRouter = require('./routes/index');
var usersRouter = require('./routes/users');
var loginRouter = require('./routes/login');
...
app.use('/', indexRouter);
app.use('/users', usersRouter);
app.use('/login', loginRouter)5.在mini/app.js里面,新增接口配置
/* app.js */
...
  globalData: {
    userInfo: null,
  },
  config: {
    api: 'http://localhost:3000',  // 接口基础地址
    file: 'http://localhost:3000',  // 文件基础地址
  }
...6.修改小程序home页面,如下
<button bindtap="login"> 登录 </button>const app = getApp()
Page({
data: {
userInfo: {},
hasUserInfo: false,
},
...
login() {
// 推荐使用wx.getUserProfile获取用户信息,开发者每次通过该接口获取用户个人信息均需用户确认
// 开发者妥善保管用户快速填写的头像昵称,避免重复弹窗
let that = this
wx.getUserProfile({
desc: '用于完善会员资料',
success: ({userInfo}) => {
wx.login({
success ({code}) {
if (code) {
wx.request({
url: app.config.api + '/login/wechat',
method: 'POST',
data: {
code: code,
userInfo: {
nickName: userInfo.nickName,
avatarUrl: userInfo.avatarUrl,
}
},
success: ({data}) => {
console.log('登录成功:', data)
wx.setStorageSync('TOKEN', data.token)
that.setData({
userInfo: data,
hasUserInfo: true
})
}
})
}
}
})
}
})
},
...
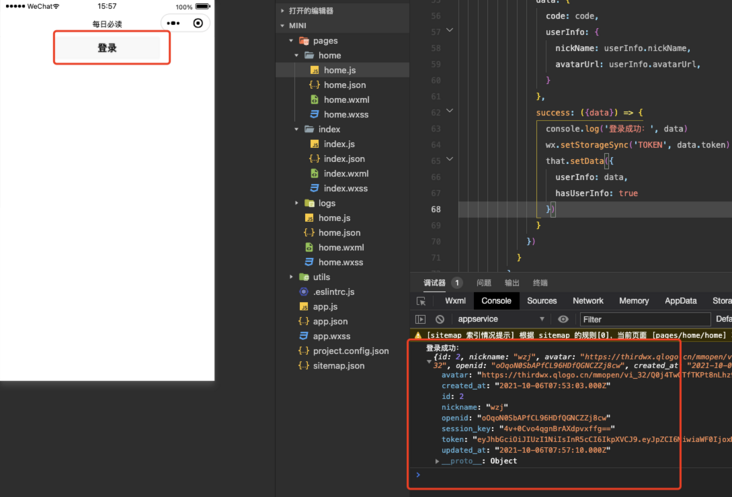
})登录成功后,将用户的登录信息打印出来,并将token保存在本地。
7.测试
启动服务器: 在server目录下,运行命令npm run start。
点击小程序里面的登录按钮,此时就会登录成功。且后台也有了用户openid信息。

demo地址
特别申明:本文内容来源网络,版权归原作者所有,如有侵权请立即与我们联系(cy198701067573@163.com),我们将及时处理。
上一篇: Mongodb 关联表查询
下一篇: node.js 如何高效的操作数据库
Tags 标签
node.jsmysqlmongodb前端javascript扩展阅读
mysql命令行常用命令
2020-06-28 19:17:05 []阿里云CentOS-7.2安装mysql
2019-04-23 23:00:14 []CSGO电竞API数据接口【West S2战队数据】分享使用演示
2020-09-03 07:18:05 []wamp配置局域网访问
2020-09-04 01:12:17 []接口测试工具apipost3.0版本对于流程测试和引用参数变量
2020-09-15 15:12:13 []vs code的使用与常用插件和技巧大全总结
2020-09-17 03:07:47 []没有伞的孩子 [必须] 要学会奔跑
2020-09-17 04:49:49 []学习之apipost3.0文档移动和文档管理教程
2020-09-18 06:19:35 []分享—如何使用apipost模拟手机实现请求发送
2020-09-18 12:15:00 []【分享】apipost如何使用mock测试
2020-09-19 21:59:25 []加个好友,技术交流

